
Your phone just dropped in water, and now you’re stuck thinking, ” Did I just lose everything? That panic is real, because one wrong move in the next few minutes can permanently damage your device. Most people make it worse by turning it on, plugging it in, or using quick “fixes” that actually spread moisture inside the circuits. The truth is, how to repair a water damaged phone isn’t about speed, it’s about doing the right things immediately. If you act smart right now, there’s still a strong chance to fix water damaged phone issues and avoid expensive water damaged phone repair later.
Don’t guess, start with the exact steps below right now to save your phone before the damage becomes permanent.
What You Will Discover in This Guide
By the time you finish this guide, you’ll know what to do in the first 60 seconds, the first hour, and the next 48 hours after your phone gets wet, without second-guessing yourself. You’ll see what actually works to fix water damaged phone issues, why the rice method often fails, and how smart water damaged phone repair decisions can save you money. It also covers when a quick fix is enough and when phone not working after water damage means it’s time to get professional help. No matter the device, you’ll have a clear path to water damage phone recovery, so you stay in control instead of panicking.
What Should You Do the Second Your Phone Gets Wet?
The first move is simple, but most people still get it wrong. Turn it off immediately and leave it off. Don’t unlock it, don’t check notifications, and don’t plug it in “just to test.” If your phone is still powered, water inside can trigger a short circuit, and that’s how small damage turns into permanent failure. If you’re serious about repair wet phone at home, this step alone decides whether recovery is possible or not.
Immediate Steps You Must Follow (In Order)
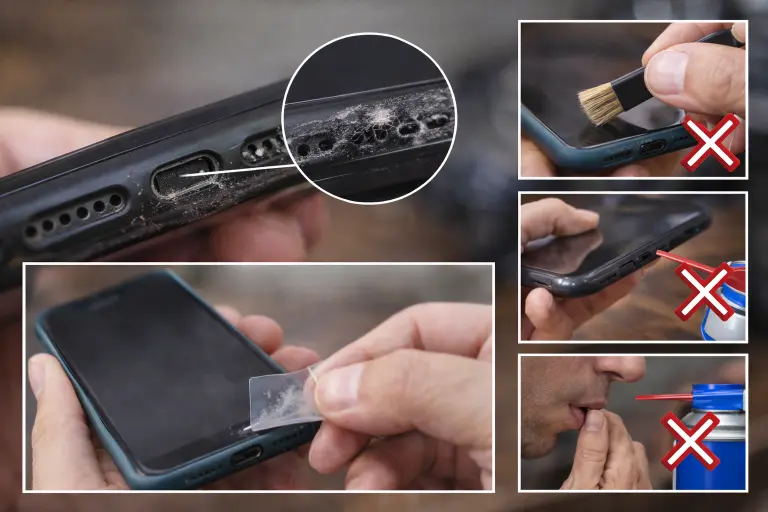
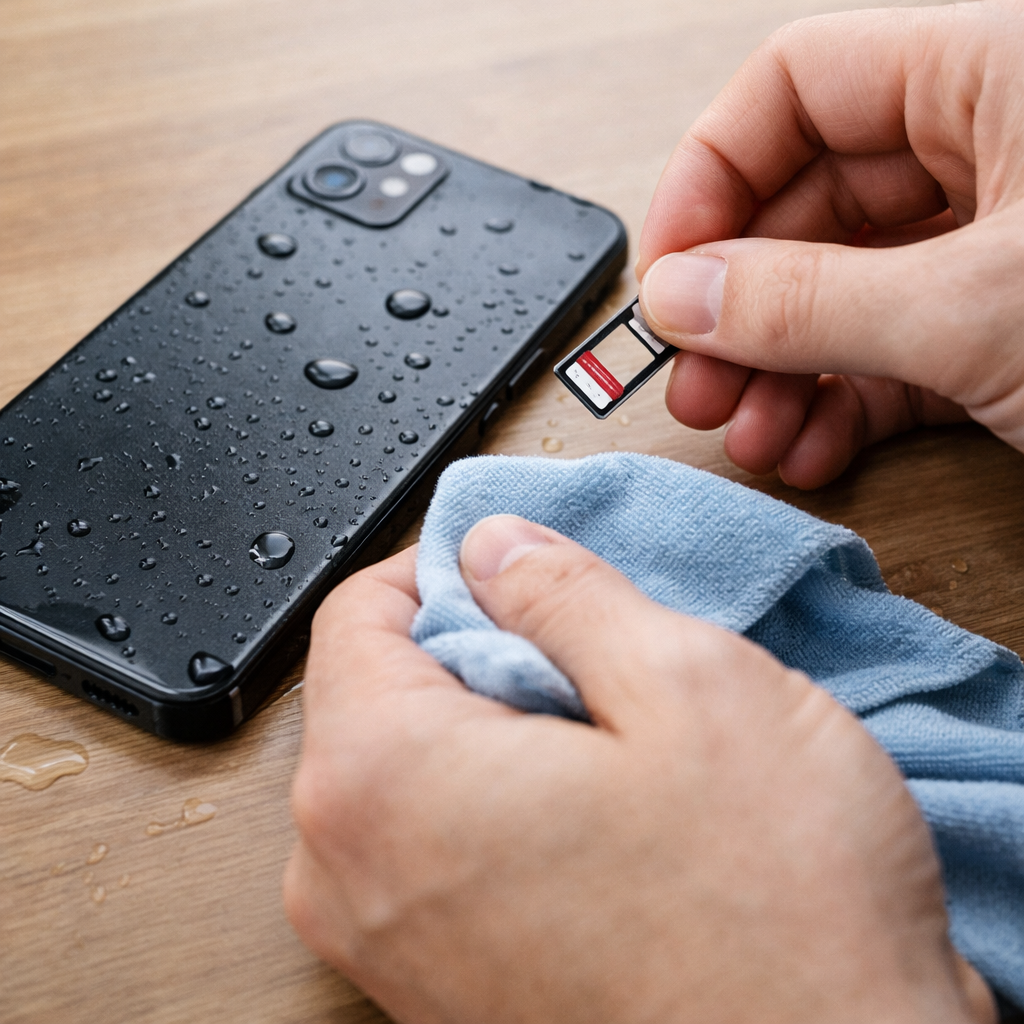
- Remove the case right away — it traps moisture against the device
- Take out the SIM card and SD card — this also lets you check the moisture indicator
- Hold the phone with ports facing down — let gravity help water escape
- Gently pat it dry with a lint-free cloth — avoid rubbing
- Stop pressing buttons — every press pushes moisture deeper inside
These steps take less than two minutes, but skipping them is exactly why many cases of phone not working after water damage happen.
What You Must Avoid in the First Hour
This is where people make things worse while trying to fix it.
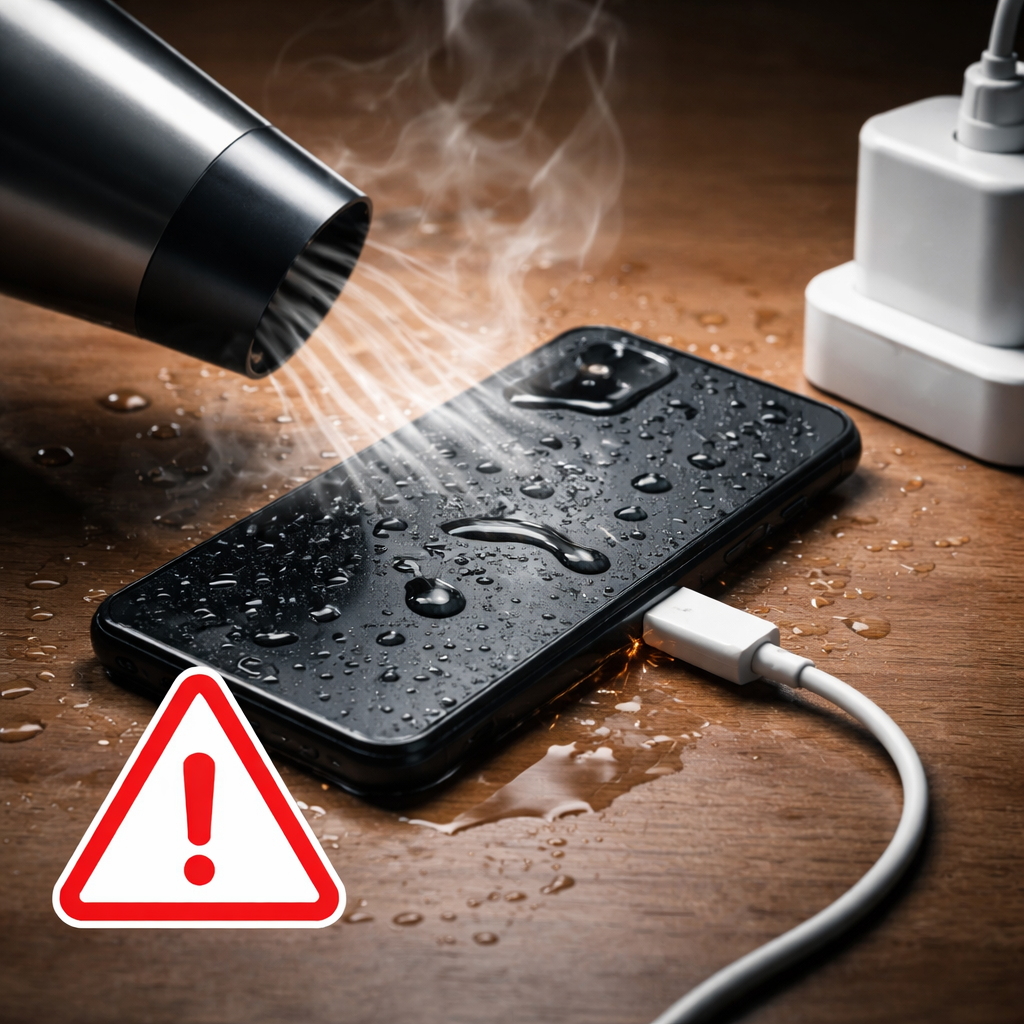
- Do NOT use a hair dryer — it pushes moisture further inside and heat damages components
- Do NOT put the phone in an oven or microwave — panic makes people try it, it only causes more damage
- Do NOT charge the phone — a wet battery can cause serious internal damage
- Do NOT shake it repeatedly — this spreads water further inside
If you’re trying to fix water damaged phone issues, understand this clearly: bad drying methods cause more damage than water itself.
Right now, your only goal is to stop further damage, not to “fix” the phone yet. Follow these steps exactly before moving to the next stage.
Does the Rice Method Actually Work?
Let’s be clear, rice is not the solution people think it is. It can absorb some moisture from the surrounding air, but it does almost nothing for the moisture trapped inside your phone. That’s why relying on it often leads to incomplete water damage phone recovery, especially when internal components stay damp.
There’s another issue most people ignore. Rice releases fine dust particles that can settle inside your charging port, speaker mesh, and SIM slot. Instead of helping, you end up creating a second problem while trying to fix water damaged phone damage.
The reason this myth keeps spreading is simple: timing. Phones placed in rice sometimes work again, but not because of the rice. They would have dried out naturally over time anyway.
What Works Better Than Rice
If you actually want effective water damaged phone repair, focus on methods that pull moisture out, not just around the device.
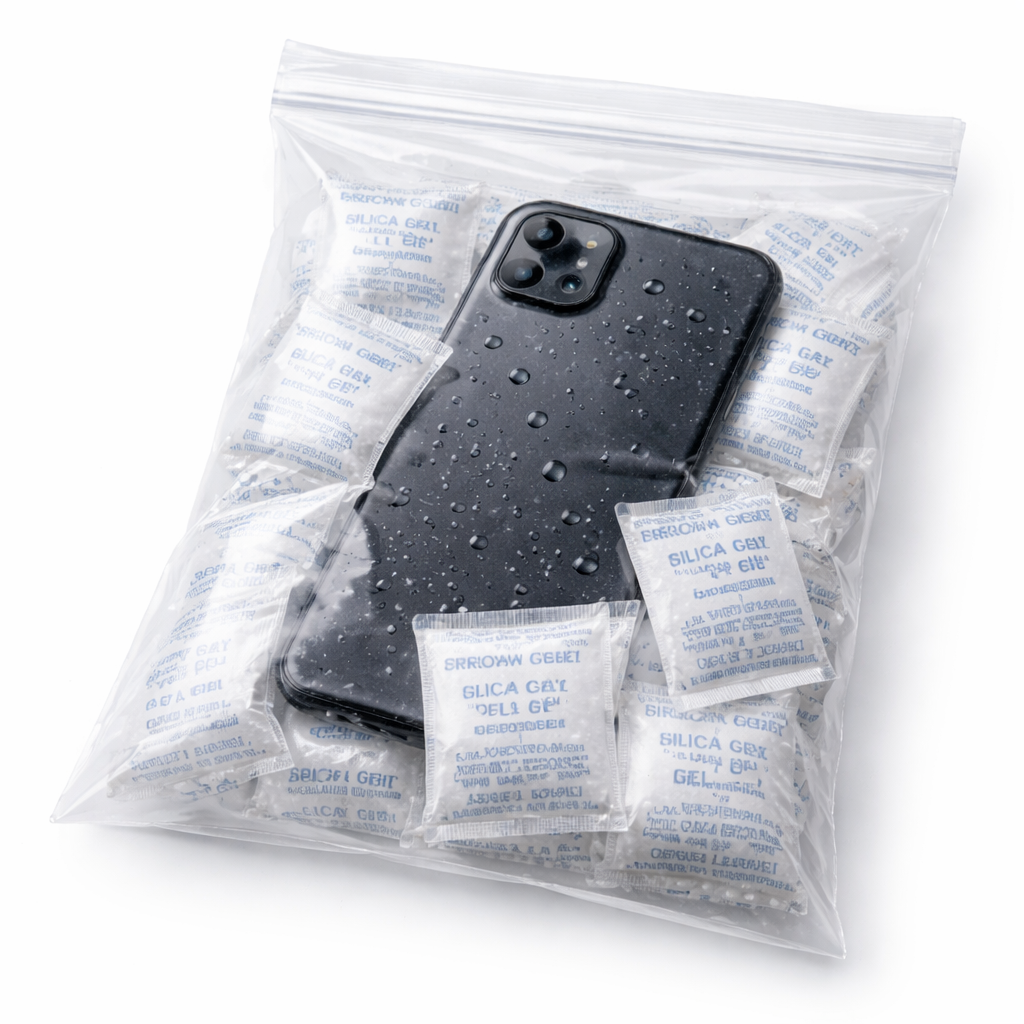
- Silica gel packets (Best option)
These absorb moisture far more efficiently than rice. Place your phone in a sealed bag with multiple packets for proper drying. - Open-air drying (Safe alternative)
Leave the phone in a dry, ventilated space with light airflow. Keep ports facing downward and avoid direct air pressure. - Specialized drying kits
Products like desiccant-based phone drying bags are more reliable, especially in humid environments.
Skip the myths, use proper drying methods if you actually want to save your phone instead of making the damage worse.
How Do You Know If Your Phone Has Water Damage?
Not all damage shows up straight away. That’s where people get caught out. Some signs are obvious. Others build quietly and cause bigger problems later. If you want to fix water damaged phone issues early, spotting both early and delayed signs matters.
Signs to Watch For
- Water droplets under the screen
- Foggy camera lens
- White or green residue in the charging port
- Muffled or crackling sound
- Poor microphone quality
- Random screen touches
- Battery draining faster than usual
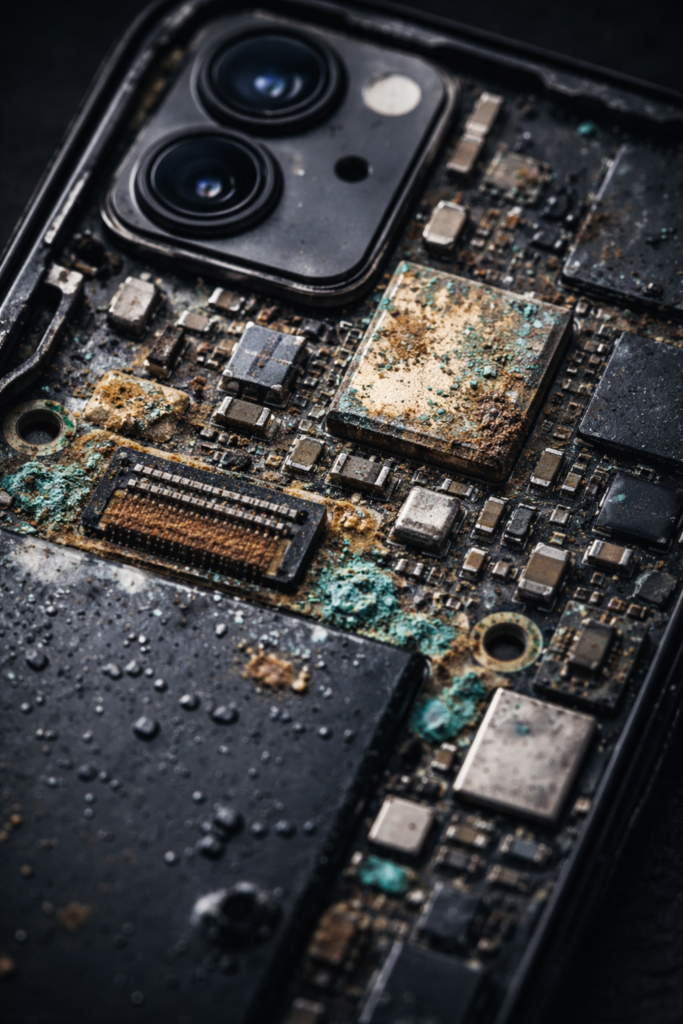
These don’t always appear at once. Sometimes the phone seems fine at first, then starts failing days or weeks later. That’s delayed damage. Moisture leaves behind minerals, which slowly cause corrosion inside the device.
If you notice any of these signs, even later, there’s a high chance internal damage is already developing, and ignoring it often leads to expensive water damaged phone repair.
If your phone was exposed to water, don’t rely on “it’s working fine”, that’s often temporary. Act early before the damage spreads.
How to Check the Liquid Damage Indicator (LDI)
Every modern smartphone has a built-in moisture indicator that tells you if water has reached the internal components.
Where to Find It
- iPhone (iPhone 6 and newer): Inside the SIM card slot
- Samsung Galaxy (S20 and newer): Also inside the SIM tray area
Use a flashlight and look directly into the slot after removing the SIM tray.
What the Indicator Means
- White or silver: No moisture detected
- Pink or red: Water exposure confirmed
This matters more than most people think. Repair shops and insurance providers check this first before approving any claim or service. If it’s triggered, your warranty may no longer apply.
Checking this early helps you decide whether to attempt a DIY fix or go straight for professional repair before costs increase.
Step-by-Step: How to Actually Dry Out and Repair a Water Damaged Phone
This is where your phone is either saved or permanently damaged. For proper water damaged phone repair, follow each phase carefully.
Phase 1: Immediate Response (First 10 Minutes)
Phone off. SIM out. Surface dried. Ports facing down. This is the base of any water damage phone recovery.
Phase 2: Proper Drying (24–72 Hours)
Place it in a zip-lock bag with silica gel packets. Keep it at room temperature. Lay it flat. Leave some air space.
- Check every 12 hours
- Replace packets if saturated
- Minimum: 24 hours
- Ideal: 48–72 hours
If exposed to saltwater or other liquids, wait longer. Rushing this step often leads to failed repair wet phone at home attempts.
Phase 3: First Power-On Test (After Drying)
Before turning it on:
- Check ports for moisture
- Inspect with a flashlight
- Avoid cable charging at first
If possible, use wireless charging. Once on, monitor:
- Screen condition
- Speaker quality
- Camera clarity
- Microphone performance
Any issue here can signal phone not working after water damage.
Phase 4: Internal Cleaning (If Needed)
If problems remain, internal cleaning may be required.
- Use 99% isopropyl alcohol
- Disconnect the battery
- Clean gently with a soft brush
- Dry with light air
- Reassemble and test
This step helps properly fix water damaged phone issues beyond surface drying.
Advanced Option: When DIY Isn’t Enough
For deeper corrosion, professionals use ultrasonic cleaning. If the phone was heavily submerged or still has issues, this is where going professional makes sense.
Follow each phase properly, small mistakes here often lead to permanent damage.
iPhone vs Android: Does Water Damage Repair Actually Differ?
Yes, it does, and it affects how easily you handle water damaged phone repair yourself. Most modern phones like iPhone, Samsung Galaxy, and Google Pixel come with IP68 ratings, but real-world exposure isn’t controlled. That’s why even water-resistant devices can still need fix water damaged phone solutions.
Where things differ is repairability and cost.
iPhone (Apple Devices)
- Harder to open
- Requires special tools (pentalobe screws)
- Limited self-repair due to Apple’s parts system
- AppleCare+ can reduce repair cost
Better for official repairs, not ideal for DIY.
Samsung Galaxy
- Similar IP68 protection
- Repair difficulty varies by model
- Samsung Care+ available
Moderate option, but still tricky for repair wet phone at home.
Google Pixel
- Easier to repair
- Parts more accessible
- Better support for DIY
Best for DIY-friendly water damage phone recovery.
What This Means for You
- Hard to open → go professional
- Limited parts → expect higher cost
- Easy repair access → DIY possible
Choosing the right approach matters more than the brand, wrong decisions here increase damage instead of fixing it.
What Does Water Damaged Phone Repair Actually Cost?
This is where things get real. The cost of water damaged phone repair can vary a lot depending on what’s damaged, and whether you go DIY or straight to a professional. If you’re trying to fix water damaged phone issues smartly, understanding these costs helps you avoid wasting money in the wrong place.
Average Repair Cost Breakdown
| Repair Type | DIY Cost | Independent Shop | Official (Apple/Samsung) |
| Circuit board cleaning | $10 – $30 | $60 – $150 | Not offered |
| Screen (iPhone 15) | $80 – $140 | $120 – $200 | $279 – $329 |
| Screen (Samsung S24) | $70 – $130 | $110 – $180 | $249 – $299 |
| Charging port repair | $8 – $20 | $50 – $100 | $149 |
| Battery replacement | $15 – $40 | $50 – $80 | $99 |
| Full board replacement | $150 – $300 | $200 – $400 | $400 – $600 |
When Repair Stops Making Sense
Here’s the mistake most people make, they keep repairing a phone that’s already financially dead. A simple rule: If repair cost crosses 50–60% of your phone’s current value, it’s usually better to replace it.
For example, if your phone is worth around $250 and the repair is $300+, you’re throwing money away instead of solving the problem. This is where smart decisions matter in water damage phone recovery, not every phone is worth saving.
The Hidden Cost Most People Ignore: Data Recovery
If your phone won’t turn on and you don’t have a backup, things get expensive fast.
- Professional recovery: $300 – $1,500
- Depends on damage severity
- Success is not always guaranteed
That’s why this isn’t just about repair, it’s about protecting your data.
If your phone still works, back it up immediately. Waiting even a few hours can cost you everything.
Smart Move Going Forward
Whether you repair or replace, don’t repeat the same mistake.
- Turn on automatic backups (iCloud / Google Drive)
- Keep your data synced regularly
- Treat backups as insurance, not an option
The cheapest fix is always prevention, set up backups now before you ever need recovery.
How Do You Recover Data From a Water Damaged Phone?
If the phone still turns on, even briefly, back it up straight away. Connect to WiFi and run a manual backup to iCloud or Google Drive. Don’t assume it’s already done. This is your safest move during water damage phone recovery.
If it won’t turn on, try a computer. Plug it in. Sometimes a “dead” phone still shows up. If it does, recovery tools can pull photos, contacts, and messages. Not perfect, but worth trying if you’re hoping to fix water damaged phone issues without losing everything.
If that fails, you’re left with professional recovery. Services like DriveSavers handle damaged devices, but it’s expensive and not guaranteed. Most people only realise this after it’s too late.
If there’s any sign of life, don’t wait. Back it up now or risk losing it all.
Case Studies: What Actually Happened
Real situations. No theory. These examples show what works, and what doesn’t, when dealing with water damaged phone repair in the real world.
Case Study 1: Quick Action, Zero Damage (iPhone 14 Pro)
- Dropped in a pool, recovered within ~45 seconds
- Powered off immediately
- SIM removed, no unnecessary handling
- Dried using silica gel for 48 hours
Result:
- Phone fully functional
- No repair needed
- No data loss
The takeaway: fast, correct action is often enough for full water damage phone recovery.
Case Study 2: Delayed Action, Partial Repair (Samsung Galaxy S22)
- Submerged in water for ~8 hours (flooded car)
- Retrieved while still powered on
- Severe internal corrosion
What was done:
- Professional ultrasonic cleaning
- Full screen replacement
Result:
- Total cost: ~$220
- Device restored and still working long-term
The takeaway: even serious damage can be fixed, but late response increases cost and complexity when trying to repair phone after water exposure.
Case Study 3: Severe Exposure, Device Loss (Google Pixel 6)
- Dropped in river, recovered after 3 days
- Heavy oxidation across internal components
- LDI fully triggered
What was possible:
- Partial data recovery (photos, contacts)
- Device not repairable
The takeaway: after a certain point, liquid damage phone repair is no longer realistic, data recovery becomes the only priority.
The pattern is clear: speed decides outcome. Act early, and you save money, data, and the device. Delay it, and your options shrink fast.
Expert Insight: What Repair Technicians See Most Often
I spoke with two certified technicians, one in London, one in Karachi. Different markets, same patterns. The mistakes are predictable, and they’re costly.
What They See Again and Again
- Charging too early
The biggest mistake. Phones get plugged in while still damp. That’s how minor exposure turns into full board failure. Most cases of phone not working after water damage start here. - Using air pressure the wrong way
Blasting compressed air into ports forces moisture deeper inside. It doesn’t remove it, it spreads it. This makes water damaged phone repair harder and more expensive later.
Insight From Real Repair Work (Humidity Matters)
The Karachi technician pointed out something most guides miss. In humid environments, phones take longer to dry internally. Moisture lingers. Corrosion builds slowly.
- Higher humidity → slower internal drying
- Slower drying → higher oxidation risk
- Higher oxidation → delayed failure
That’s why some phones work fine at first, then die weeks later.
What Professionals Actually Recommend
- Don’t charge until fully dry. No exceptions
- Avoid forcing air into ports
- In humid climates, consider internal cleaning early
- Don’t trust “it’s working fine” as a final result
If you want to avoid expensive repair later, treat water exposure as a serious issue, even if the phone seems fine at first.